Gillette Ridge
Gillette Ridge, is a Public, 18 hole golf course located in Bloomfield, Connecticut.
Gillette Ridge golf course first opened for play in 2004. The par-72 course was designed by Arnold Palmer and Ed Seay. In 2008, some changes were made to the course. While retaining much of the challenge of the Palmer Design layout, the new manager of the layout, Matt Manchetti and MDM Golf, LLC, made a number of holes more approachable for a wider range of skill levels. What the changes did to the course is make it more playable for all golfers. The skilled player is still supremely challenged because you can't get around the fact that it plays 7,191 yards from the tips. But the average player now has more options on how to play some of the more difficult holes on the course.
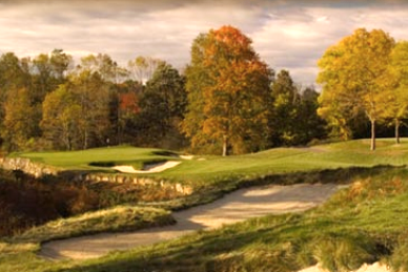
Gillette Ridge was named to honor Francis Gillette, a local 19th century reformer, politician and business leader, whose house still stands on the site. Gillette Ridge will challenge, amaze and excite you as you maneuver through a variety of terrain; tree-lined fairways, spectacular carries and several natural obstacles.
Arnold Palmer has capitalized on the site's natural beauty. Streams, lakes, elevation changes, and mature trees are all part of this tremendous golf experience.
Black tees: 7,191 yards, course rating 74.8, slope rating 135
Gold tees: 6,703 yards, course rating 72.2, slope rating 133
Silver tees: 6,133 yards, course rating 69.3, slope rating 128
Bronz tees: 5,582 yards, course rating 67.2, slope rating 117
Hole #1: A par 4 with a slight dogleg right and is the only bunker-free hole on the course. Your tee shot should favor the left side of the fairway, avoiding the trees on the right. From there you will have an open approach to the green and a good chance to make par.
Hole #2: A par 5 featuring the Heublein Tower in the distance and a chance to go for the green in 2. The safe play is to lay up on the left side of the fairway to avoid the large pond that fronts this green. A short approach over the water will give you a birdie putt.
Hole #3: Off the tee favor the right side to avoid bunkers left and to set up an open approach shot to the green. This green is protected by water left and bunkers short.
Hole #4: This par 3 requires a well-struck shot to hit this narrow green that is protected by bunkers right and left. Make note of the hole location because this green is over 50 yards long.
Hole #5: A short, picturesque par 4 features bunkers left and right off the tee. Split the fairway to have an open approach at this shallow green. You will have to be accurate on your approach with a stream and ravine to carry and bunkers guarding this green.
Hole #6: Tee shot accuracy is a must here to hit this tight, tree lined fairway. Favor the left side to give yourself the best angle to attack this green. A deep bunker guards the front left so any misses should be right.
Hole #7: This monster par 5 measures over 600 yards from the tips and is the #1 handicap hole. Large trees line this fairway leading up to a green that is protected by a stream and ravine, which you must carry to get home safely.
Hole #8: A par 3 that is all carry over wetlands. The green sits diagonally from front left to back right off the tee and has deep greenside bunkers on the right. There is a bail out area left here to be safe.
Hole #9: A slight dogleg left par 4 will close out the front nine. Favor the right side of this fairway to avoid the left fairway bunker. Accuracy is a must approaching this green with deep bunkers swallowing anything short.
Hole #10: This par 4 is a dogleg left with a carry over water required to hit this wide fairway. A huge bunker guards the left side and the Isamu Noguchi sculptures are overlooking the right side of this fairway to give you luck. Another heavily bunkered green awaits any miss-hit approach shots.
Hole #11: This scenic par 3 will make or break you. A pond sits right of the green along with bunkers left and long. A very accurate shot is required here to hit this green. Any misses to the right will be wet!
Hole #12: A par 5 that emphasizes placement rather than length. This hole doglegs slightly to the right and features a bunker that looks to be greenside, but is actually set back 62 yards from the green. Don't be deceived!
Hole #13: Finally a chance to get one back. This short par 4 is drivable for the long hitter, but doesn't come easy. Bunkers guard the left side of the green and another bunker awaits on the right short of the green to gobble up any errant shots.
Hole #14: Straight away par 4 that demands accuracy to split this tree-lined fairway. Thread the needle and avoid the left fairway bunker to give yourself a good look at this green. Don't go long however on your approach, and if you miss, miss left to stay out of the right greenside bunker.
Hole #15: This par 3 is heavily guarded by deep bunkers short and left of the green with trees guarding the right and any long shots. Choose the right club to avoid the trouble and leave with a par.
Hole #16: The hole plays slightly downhill off the tee but precision is required. The fairway must be hit in order to have any chance of an open approach shot to the green. Leave yourself about 150 yards for your second shot so you have a level lie because your next shot is all carry over wetlands.
Hole #17: Placement is crucial on this dogleg left par 5. Your second shot must be up the left side in order to get a look at this green, trees block out the entire right side. Be very accurate however, because there is a huge drop-off left, long, and right of the green.
Hole #18: The finishing hole is the longest par 4 on the course. You must first carry the wetlands off the tee and then split the fairway bunkers left and right. If that isn't enough you now must carry the pond and bunker that guard the front of the green. Any misses here must be left to avoid all the trouble right.